


Shopping Cart

Bicycle Mechanic services
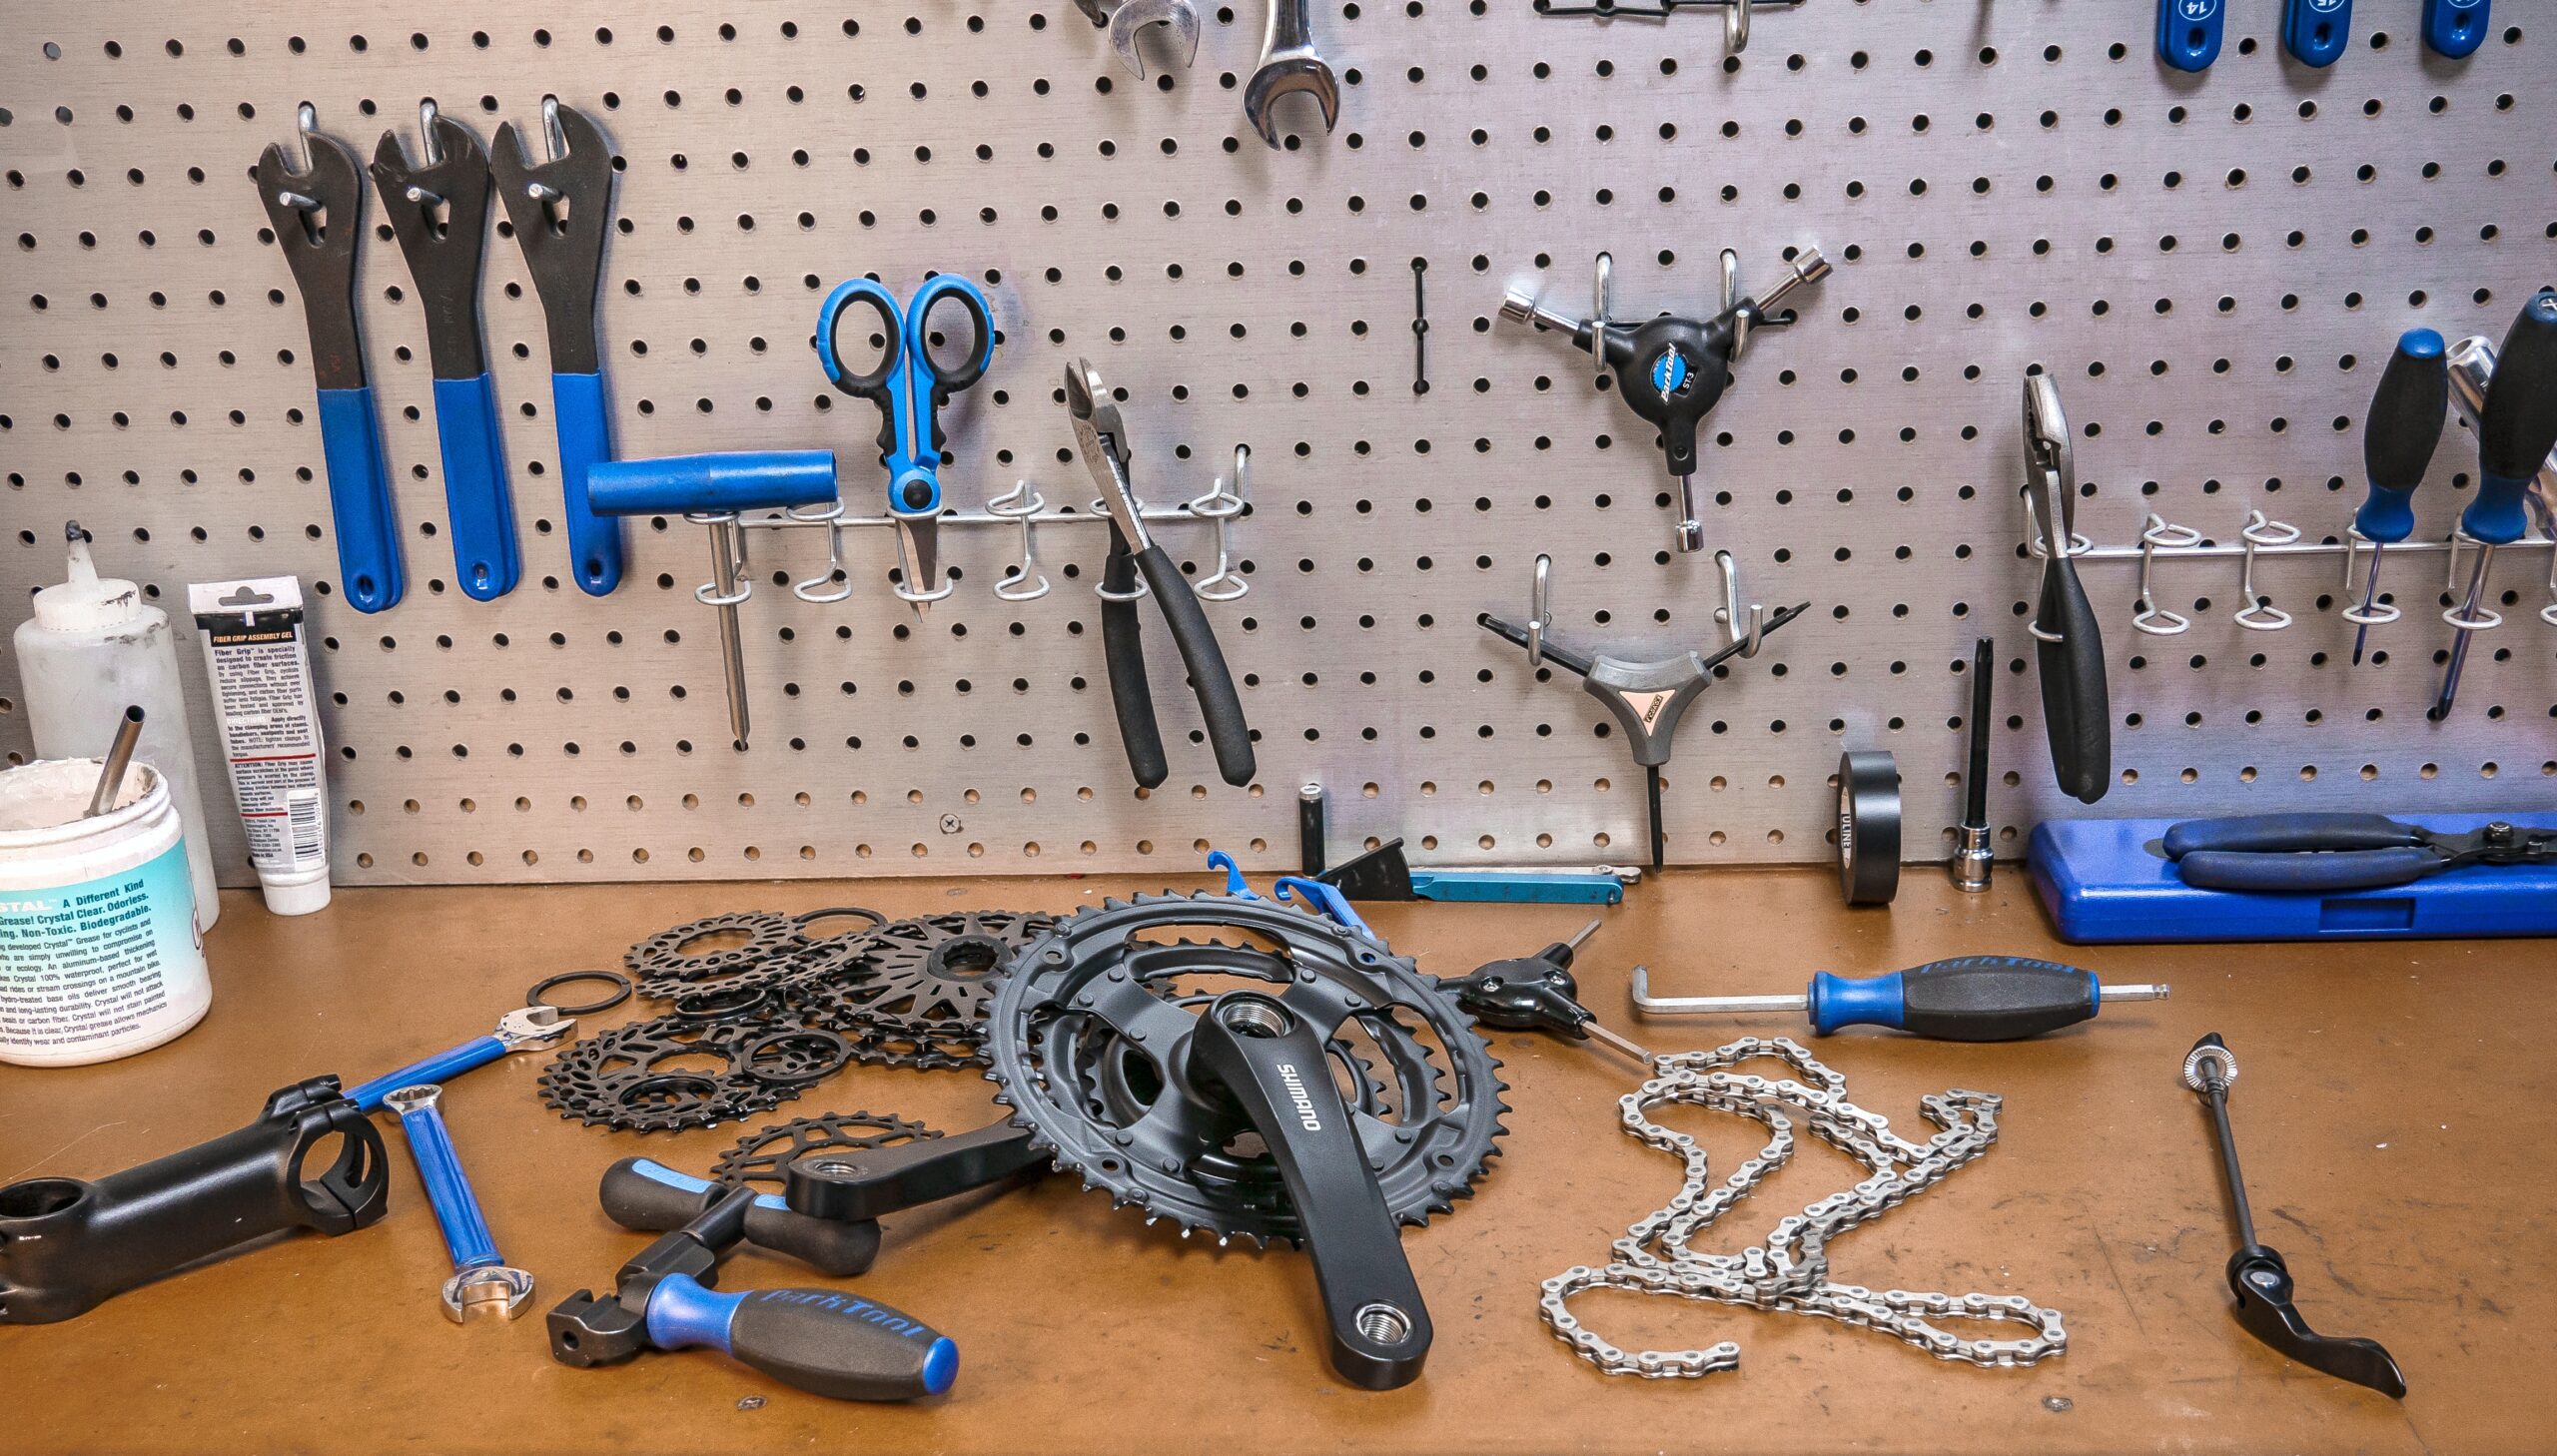
Bicycle mechanic recommendations for what tools do i need for bicycle maintenance at home in my workshop
You have a collection of bikes in the garage from various family members and they are looking a bit worse for wear (the bikes, not your family members). New bikes are so expensive these days so you’ve made the decision to roll up your sleeves and resurrect them from the dusty rusty abyss.
So, workspace?
check.
Tools?
hmmmm, what am I going to need?
This is one of those questions that no matter who you ask you will always get a different answer each time. Just to make it even more difficult to answer it will also depend on the bike that you have as they will likely require specific tools.
In this article I will list ten of the most common tools you will likely need to get started with a home based bicycle workshop. There are other tools you will likely need along the way too but with this list you will have what is needed to do the majority of work on your bikes, as you become more experienced you will soon learn what else you need.
So lets get started….
Note: this article contains affiliate links. If you click on them and make a purchase I may earn a small commission at no expense to you.
The humble adjustable spanner, shifter, wrench, it has many names but always does the same thing. It adjusts the jaw opening to fit the particular size of bolt head you need to tighten/loosen.
This tool will most likely be one of your primary tools that you use most often, it will take a lot of use and abuse and will be used on some of the most tightest nuts you can imagine so its going to have to be strong too.
Bolt heads and nuts obviously come in different sizes and so do the adjustable spanners. They are sold by handle length and its going to be worth getting at least two different sizes possibly three if your budget permits.
To start with, I would recommend a small one and a medium sized one such as a 6 inch and 8 inch. A 10 inch one would be great for when you really have to grip it tight with both hands and pull with all your might, yes, we are still talking about adjustable spanners here.
These tools are worth investing more of your hard earned cash as they are going to need to be of a higher quality.
This spanner set from Bacho offer good quality materials and craftsmanship and a good range of sizes without breaking the bank. There are other premium brands available but expect to pay the premium price.
Another staple tool for the home workshop, Allen or Hex keys are used on nearly 99 percent of bikes and it will serve you well to have a good comprehensive set. More modern bikes are using torx head screws more often so if your bike is only a few years old it will likely have some of these too.
Similar to your adjustable spanner, Hex keys are going to come under a lot of load when in use. They will also suffer the edges becoming rounded if they do not fit correctly into your bolt head/screws. So again, it really will be worth your while to invest in a good quality set of hex and torx keys, buying from a premium brand will help ensure your tools have good quality materials and manufacturing processes to ensure it is fit for purpose. Too often have i seen cheeper tools that have poor dimensional tolerances, become damaged or damage the fixing, even worse i have seen my fair share of them snapping too leaving a wonderfully sharp end behind.
Hex and Torx keys also come in various different forms from separate bits that fit into a socket driver to extra long ones with a ‘T’ shaped handle and of course your common garden variety of ‘L’ shaped ones.
Keep it simple and start out with a set of long handled ‘L’ shaped ones. There is no need for sets with a million different socket bits that get lost as soon as you drop the box on the floor. You will soon learn when you need any of the specialty shaped ones as you go along.
These sets of hex and torx keys are from a German company called Wera, they produce some of the worlds most premium tools and these are no exception. Sure, they are expensive but they will be a very worth while investment.
Another of those tools that you will use on 99 percent of all bikes in some way whether it’s levering your chain back onto the cassette, scraping rust of the frame or adjusting the limit stops of your derailleur. The screwdriver is going to have a common appearance in your workshop and probably not just for screws so make sure you invest wisely and get something that will endure and do the job well.
Screwdrivers have a nasty habit of wrecking the screw head or becoming chipped, this is normally down to the materials and dimensional tolerance of the tool and screw (assuming you are using the correct size with good technique). Make sure that at least your tool is not the issue buy making a good initial investment when kitting out your workshop.
Like the other tools mentioned so far, screwdrivers come in many different forms from multi bit sets to ones that resemble crowbars. I am going to suggest to keep it simple and get a set of fixed handle ones with a mix of flat head, Philips and possidrive tips. Again i would steer away from these sets with a thousand different types of fittings, trust me, when you drop them they will fly everywhere, at least with a fixed handle you wont loose them as easily.
Again, I’m going to suggest Wera for the screw drivers, they are famous for them and have spent a lot of time and money in the quality and ergonomics. They are bought and trusted by so many tradespeople around the world that they have become a default tool for them to buy.
A what now? A cone nut is located on your axles and is used to keep your axle fixed in position by applying a force to the hub bearings. These cone nuts if not adjusted properly can become either too tight and cause excessive friction resistance or too loose and your axle can slop about. Both scenarios is bad news for your wheels so its important to check them regularly.
Cone nuts are often round with two thin flat spots machined into them, its tricky getting any normal spanners to fit so its good to buy a thin cone wrench tool. A word of caution here, because they are thin compared to normal spanners they can have a tendency to twist and slip of the nuts. Make sure you invest in a good quality brand so that the tool is less likely to fail in use.
Cone wrenches come in a variety of jaw opening sizes, you can even buy a whole set of them but that will likely cost a fair bit and you may only end up using one or two anyway. So which is the best size to buy? Well, that will depend on your bike but the most common size is 15mm however don’t assume it will be the one for you, go check first!
Below are links to Park Tool, this brand is synonymous with bicycle tools. They have become the default brand for most professional bike shops and with good reason. The quality is great, the price is reasonable and they are designed specifically for professional bicycle mechanics
Typical Cassette Removal Tool
Freewheel Removal Tool
Removing your cassette or freewheel sprockets is important when servicing your bike, these places collect dirt that is difficult to remove without a strip down and can cause premature wear if you leave it too long.
This is the part where the tools will become specific to your bikes. First things first, you will need to know if you have a freewheel or a freehub. Basically a freewheel wheel has the coasting mechanism built into the sprocket cluster whereas the freehub as the name suggests has the coasting mechanism built into a hub.
To tell if you have a freewheel or a free hub first remove the rear wheel from the frame, then spin the sprocket set backwards. If the splines for the removal tool spin with the sprocket set then it is a freehub system, if they are stationary then its a freewheel system. Park Tool has a great explanation and video about it.
There are dozens of different types of freewheel and cassette removal tools depending on your bike brand. So, you are going to have to look at your bike manual or find out online which tool you need. Something to think about, if you are going to be removing the rear cassette or freewheel with a tool then you are going to need a chain whip too.
A common cassette removal tool that fits most Shimano cassettes is this one from Park Tool. Its great quality and no-nonsense make it a respectable tool to have in your collection (if this is the correct tool for your bike!)
If you are going to remove your cassette set then you will need one of these tools. Did you spin the sprocket set backwards for a freewheel or free hub check? Notice the splines for the removal tool spin with the sprockets? Thats the direction you have to turn the cassette locking ring so you have to stop the cassette spinning. Enter the chain whip, use this to wrap around the sprockets and hold them still while you use the removal tool to undo the lock ring.
Chain whips are pretty standard across most models, of course there are some exceptions but generally you would be safe to buy one without too much worry as to its fit. Having said that, if you do a search for chain whips then you will quickly get overwhelmed with a hundred or so different brands all offering pro level performance at really low prices. The problem with a lot of these cheeper tools is the chain attached to the tool can be very week and snap with a lot of torque.
If you are going to buy one of these tools then go for a well known brand, you will pay almost double for it but you are more likely to get the job done with it and not end up giving yourself a black eye when the chain whip fails.
Park tool has a great chain whip with a sturdy chain and a correctly heat treated steel handle to ensure its durability. The handle of this tool is long too so you you can generate a larger amount of torque for when the lock ring is being stubborn. Park Tools make bicycle tools for professional bike shops and have become a default brand for many bike mechanics so they need to be of a high quality to maintain that reputation.
12 Speed chain breaker from Topeak
Topeak power link pliers for removing master links.
There will be occasions during your long relationship with bicycles when you need to remove the chain, be it to replace an old worn rusted chain or to simply remove the chain because you need to strip down the bike.
It used to be that a simple chain breaker is all you needed, now however, there are a few different type of chain breaking methods depending on your chain type. Still the most common is the handle and screw to push out the chain pin, however now there are quick links, which require a set of specialist pliers to squeeze the pins together and disconnect the link plate. There are also some Campagnolo chains, which require you to replace the pin with a new one and peen the end to lock it into position.
As usual, check what you have on your bike then buy the tools you need, make sure you read the specification of the tool as some chain breakers will only work up to 8 or 10 speed chains. Generally chain breakers are pretty robust when used correctly, it is important that the screw pin is aligned with the chain pin at all times otherwise you will risk breaking either your chain or tool, maybe even both. If you have never used one before it’s well worth checking youtube for some videos to show correct technique. Quick link removal tools are a little more forgiving when using as they are just used to squeeze the chain rollers together at the master link node.
Topeak is a reputable brand for manufacturing excellent quality professional bicycle accessories, especially their multi-tools
Top 5 Bicycle Multi-Tools in 2022
This chain breaker from Topeak represents excellent quality for the price, it is compatible with chains from 6 speed up to 12 speed (excluding the Campagnolo peen link).
Also from Topeak is this set of power link pliers for removing master links, spring loaded and made from hardened steel they are a great addition to any tool set.
Crank Arm Puller
Typical Bottom Bracket Tool
The bottom bracket on a bike is the bit of the frame where the pedal crank passes through and is supported by bearings. The bottom bracket will see a lot of punishment from riding and will sometimes need tightening up or in cases of extreme wear you may have to replace the bearings.
Bottom brackets come in many different forms from the old cup and cone style to press fit bearings. Unfortunately, there is no common tool that will fit most bikes so you really will need to research your bike specifications and find out what you need to replace your bearings or service them if need be.
A great resource is the Park Tool bottom bracket identification page, here it lists all the most common types of bottom brackets and their standards along with the tools required to remove them.
The trouble with removing the bottom bracket bearings is depending on the type, you are at least going to require a crank arm puller tool to remove the pedals from the crank axle. You may then need one or even two tools to remove the bottom bracket inserts. If you have press fit bearings then you will also need a bearing extractor tool and a bearing press.
Its difficult to advise a specific tool for this so my advice is to research your bike, find out what tools you would need and ask yourself “would it be cheaper to just take it to your local bike shop than to buy all the tools?” If you are planning on doing this operation on multiple bikes then it will be worth getting all the tools if its a one off job then consider paying a professional to do it.
Break and gear cables will likely be in the top three components you are likely to need to replace often. When the cable becomes stretched over time, rusted or has got dirt in the cable sheath they will need replacing. When the cable has been clamped into position it squashed the cable, this can make it difficult to pull free from the outer sheath when removing them so its easier to just cut them all free and remove the left over bits.
Brake and gear cables (not the hydraulic ones) come in standard sizes when new, they will likely be too long for your setup so you will need a way to cut them cleanly to avoid and dangerous frayed ends. You will also need to be able to cut the outer sheath too without deforming the protective metal spiral inside.
Enter the bicycle cable cutter, this set of cutters has specially designed hardened curved cutting blades so as to minimise any cable deformation and create a clean cut. With a simple snip you will have your cables cut neatly to the correct lengths saving you time and effort.
This set of cable cutters from Draper are great, they produce a nice clean cut with minimal finishing required. They are reasonably priced and offer good quality materials, perfect for anyone setting up a home workshop.
Pliers are one of those overlooked tools, you use them for lots of things and never pay them any thought until they go missing then its job stopped and down tools time. If you don’t already own any then i recommend you get one of the sets with a standard set of pliers, a long nose set and wire cutters. The wire cutters will be least useful of the set but its surprising how often you use them for jobs around the house.
Pliers are great to have for whenever you need to grip something to pull free, they are great to hold brake or gear cables when adjusting the tension. The long nose pliers are fantastic at picking bearings out of their housings.
Pliers tend to get some abuse in a workshop so its always prudent to make sure you are buying a quality set and not get tempted by the super cheap set with fifty different pliers. The cheaper sets tend to not have the same quality heat treatment or steel so they either snap or bend when applying too much pressure or the teeth get all burred and they become unusable.
I would normally recommend a brand such as Knipex for pliers, they are famous for making the ultimate premium plier tools. The price can often put people off though, if you can afford them, fantastic! I fully recommend them. If however you want something that represents good quality and reasonable value then check these Bosch Professional set of pliers.
Now you have gathered all your tools to kit out your workshop, have you had a thought to how you are going to work on your bikes? I highly recommend a bicycle stand, your back and knees will thank you for it. Not only are they great for helping you work on your bike but they are very useful in holding your bike when giving it a good clean down.
When shopping for a bike stand you need to take note of how heavy your bike is, these stands have maximum weight limits so if your bike is a heavy e-bike then it may be cause the stand problems.
Again, its worth making a good investment into a good brand for bike stands especially if your bike is an expensive one. You wouldn’t want the stand to fail and drop your beloved two wheels unceremoniously on the deck would you? On a serious note, the more premium brands tend to have better clamps on the head of the stand for gripping your bike and not slipping or rotating under load. Now don’t get me wrong, some of the cheaper ones can do the job, I even still use one from Halfords but i tend not to put the expensive bikes on this stand just in case.
Park Tool has a great bike stand but its also on the high side for cost, with good reason of course but it may put off some of the casual home based mechanics just setting up. So i have found another slightly cheaper but still respectable alternative
Always remember to clamp the seat post to reduce the risk of crushing your frame (unless you have an aerodynamic carbon seat post)
Some other bits of equipment you may want to consider are:
I have also written an article “which is the best quality bicycle tools to buy” in which I explain what makes a quality tool from materials to manufacturing. I give a list of some good brands of tools to help when making your tool investment.
| Cookie | Duration | Description |
|---|---|---|
| cookielawinfo-checkbox-analytics | 11 months | This cookie is set by GDPR Cookie Consent plugin. The cookie is used to store the user consent for the cookies in the category "Analytics". |
| cookielawinfo-checkbox-functional | 11 months | The cookie is set by GDPR cookie consent to record the user consent for the cookies in the category "Functional". |
| cookielawinfo-checkbox-necessary | 11 months | This cookie is set by GDPR Cookie Consent plugin. The cookies is used to store the user consent for the cookies in the category "Necessary". |
| cookielawinfo-checkbox-others | 11 months | This cookie is set by GDPR Cookie Consent plugin. The cookie is used to store the user consent for the cookies in the category "Other. |
| cookielawinfo-checkbox-performance | 11 months | This cookie is set by GDPR Cookie Consent plugin. The cookie is used to store the user consent for the cookies in the category "Performance". |
| viewed_cookie_policy | 11 months | The cookie is set by the GDPR Cookie Consent plugin and is used to store whether or not user has consented to the use of cookies. It does not store any personal data. |